How to Make a Rc Airsoft Turret
How to Make a Rc Airsoft Turret
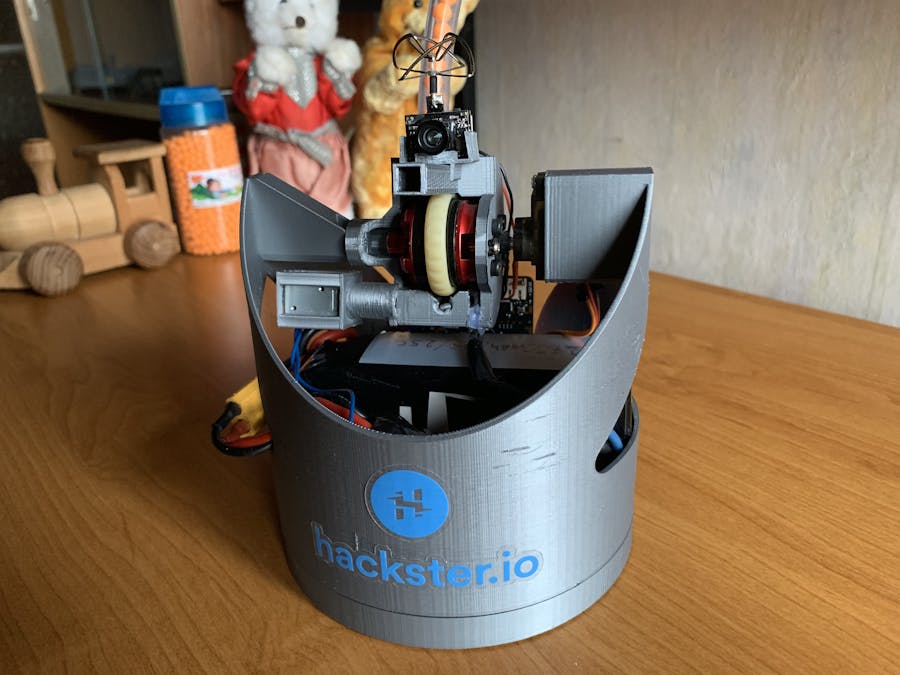
RC airsoft turret
Want to shoot your friends with airsoft Bbs without giving them a chance to shoot back? Now here's your take a chance!
Intermediate Full instructions provided Over 1 twenty-four hours 899
Things used in this project
Hardware components | ||||||
 | × | 1 | ||||
 | × | 2 | ||||
| × | 1 | ||||
 | × | 1 | ||||
| × | i | ||||
| × | 1 | |||||
| × | i | ||||
| × | i | |||||
| × | 1 | |||||
 | × | 10 | ||||
 | × | 1 | ||||
 |
| × | one | |||
 |
| × | i | |||
 | × | ane | ||||
 | × | 2 | ||||
| × | 1 | |||||
| × | i | |||||
Software apps and online services | ||||||
_9nsOFQ7ama.png?auto=compress%2Cformat&w=48&h=48&fit=fill&bg=ffffff) | ||||||
Manus tools and fabrication machines | ||||||
 | ||||||
 | ||||||
Story
Abstract
A couple of years ago, during some company team edifice activities I took part in some laser tag matches. I really loved information technology, but due to it's express outdoor reliability, I got interested in airsoft. I dearest its idea of shooting real bullets/assurance.
Equally I really love robotics and remote controlled things, I thought I'll build a custom airsoft turret that I tin command with an RC transmitter and run into it's results in my quadcopter's FPV headset. That's definitely not something that anyone would wait and it could hateful a lot of fun, even outside airsoft matches.
Now you are reading the story of how I congenital the offset version of it.
The broad plans
For some reason the stl files that I uploaded under the attachment section does not render at all due to a "This sketchfab 3d model has not been published even so" error (I don't know what to do with that, reupload didn't help), but as far equally I can see, yous can however download the 3D models.
I have a 3D printer so information technology was an obvious choice to blueprint it with CAD and print it out. Just getting an airsoft gun and using it for firing would be an obvious choice, but I wanted to experiment some, even if the terminate results might not be as effective as a store-bought airsoft gun. My firing mechanism is definitely a foreign 1 and you can tell it past just looking at it. When I was testing it, people rarely knew what was happening and got concerned only when they heard the BLDC motor spinning upward before firing.
I wanted it to spin around in 360° to cover all angles, move up and down and to accept a way for me to see what it is firing at for ameliorate aiming. Information technology means that it besides needs a wireless camera that works reliably.
For this build I used numerous old drone parts, that were merely lying around. Eachine sells not too expensive and very compact analog cameras that only requires a 5V power supply to operate. Camera, transmitter and antenna all in one. I used an Eachine TX03 as I already had one, unused.
They can be used with whatever FPV headsets, but you lot tin also buy USB receivers for phones. The USB receiver will be recognized by your phone or PC as a full general webcam. Epitome quality won't be the best, but it will be perfectly usable for this task.
It would be obvious to utilise an RC transmitter for controlling it, but they tin can be quite bulky, which is not a practiced thing in this case. For a first revision I idea I'll attempt something very compact. I had one of these 433MHz garage door opener style transmitters/receivers for years and never used it for anything:
They are very cheap and very easy to employ. The receiver has 5 signal pins. When you button down any button on the transmitter, while pushing, the UT pivot is High. The proper pin will also be High, only that also stays loftier until the next update.
I was sure that it will have limited capabilities, peculiarly without analog sticks to control the turret, but I liked the small form cistron, so I figured it worth experimenting with. It was lying in my "Arduino box" for years, unused.
For the encephalon of the turret I'll be using a BBC micro:flake. It is a very unique open up source, ARM based microcontroller that is designed by BBC for estimator educational purposes. This is one of the few parts of the turret that is actually new. It has a nice 5X5 LED matrix display and it is a nice and relatively inexpensive microcontroller. It also has accelerometer and BLE capability, but I won't exist using those now. Nevertheless the BLE based control can be an interesting way forrad in the time to come. Usually people use Python to program the micro:bit, but I'll exist using the Ada programming language this time!
For the firing mechanism I idea I endeavour to build a baseball pitching machine style machine. It is a simple concept that can fire basically as fast equally you can load BBs into it:
I specifically liked this version of it as it required only 1 motor to work with a very uncomplicated design:
Equally you'll come across my firing mechanism is basically the same concept and blueprint but with some adjustments for this specific apply example. I used and old 920KV BLDC motor with an old ESC.
The 920KV BLDC motor that I used has a (now) funny story to information technology:
The motor attached to an early test print
five years ago, when I was building my first quadcopter with a custom, wifi based wireless communication method, I made some mistakes and I almost lost the quad. No fail safety is not a good idea and information technology almost went to infinity and beyond.
It was loftier up and also moving away from me. Before I lost connectedness, I could lower the throttle enough then it could land relatively safely almost 4 neighbors away. I heard that information technology was still buzzing afterward it landed (crashed) and I merely couldn't reconnect to it. When the neighbor came out and let me to get to it I realized that the drone was upside downwardly, ane motor (this motor) on muddy concrete and the others in mud, full of pig shit and all spinning. I managed to disconnect the bombardment, only the motor on the concrete literally sanded down virtually 1 cm of aluminum of the motor'south shaft and the whole propeller. It took hours to make clean the drone and of course I had to buy new motors, propellers and an arm and information technology smelled like pig shit for weeks, only it still flies! No humans or pigs got hurt, only I learned that never fly UAV-s, especially unreliable ones in populated areas.
TL;DR this motor was perfect for the job as information technology can spin properly, bit I literally cannot utilize information technology for anything else without a threaded shaft.
Building the turret
When it come to the designing role, naturally I created many iterations, before I ended up with the current one. Let's beginning with the most circuitous role: the caput of the turret:
1 / 2 • The turret's head
If you examine the model, you might detect that it is impossible to print without supports, and some of those supports demand to exist in the within channels to which makes them well-nigh incommunicable to remove without damaging the model.
As a workaround, I used a clever technique and so I can print without generating incommunicable to remove supports: built-in supports and sacrificial walls. Here'due south the version where I added those:
one / 2 • Built-in back up in the model
These kinds of supports require a well tuned-in 3D printer, so you lot tin print overhangs without bug. I used a quite low quality filament, and then not even that is needed, just naturally useful. You still demand to generate supports, but only where the model is touching the build plate. Overhangs are not possible where the nozzle would need to motion in an angle (due east.g. overhang corners, holes), so I added i one layer thick sacrificial walls at those places, and so you lot can print information technology properly. After the printing is finished, you lot simply need to remove those one layer walls. That way you tin practice a successful print, just like this i:
1 / 2 • The printed turret caput
The white rubbery ring effectually the motor is from an quondam, inexpensive mouse's ringlet wheel. Originally its diameter was much smaller, but I warmed it up in some hot water and it became much easier to work with. It stretched nicely and now it is a perfect fit and catches the airsoft Bbs quite well.
Press the other components are mostly straight forward. The trigger solenoid holder too has a sacrificial wall, but likewise that, all 3D objects can exist printed without any special care.
one / iii • Prune and trigger attached to the head
For now I used a simple gravity fed clip/magazine which is just a tube. I'm thinking near a better solution which can hold more BBs, can work in whatever angles and doesn't await like a long plastic antenna, but it is good for now.
The Eachine TX03 can become quite hot during operation if you utilize its 200mW mode. You should either employ PETG (or something that can handle some heat without deforming) or you should utilize the TX03 in a power mode that produces less heat.
For the 360° horizontal motion, we need to modify a servo to take continuous rotation. I won't become into details nigh that. You can but follow this tutorial:
After that you just need to screw the parts together:
one / 3 • Bottom function with the bearing
A smaller begetting would take besides worked, but I was thinking almost using a sideslip ring and put the electronics in the bottom. This bearing left that option open up for me. The big pigsty on the bottom volition aid you attach the turret trunk to the bottom with screws.
The BBC micro:bit and its expansion board has a dedicated space at the back of the body. After the head and body office is complete, we tin move on to the electronics.
Wiring it upwards
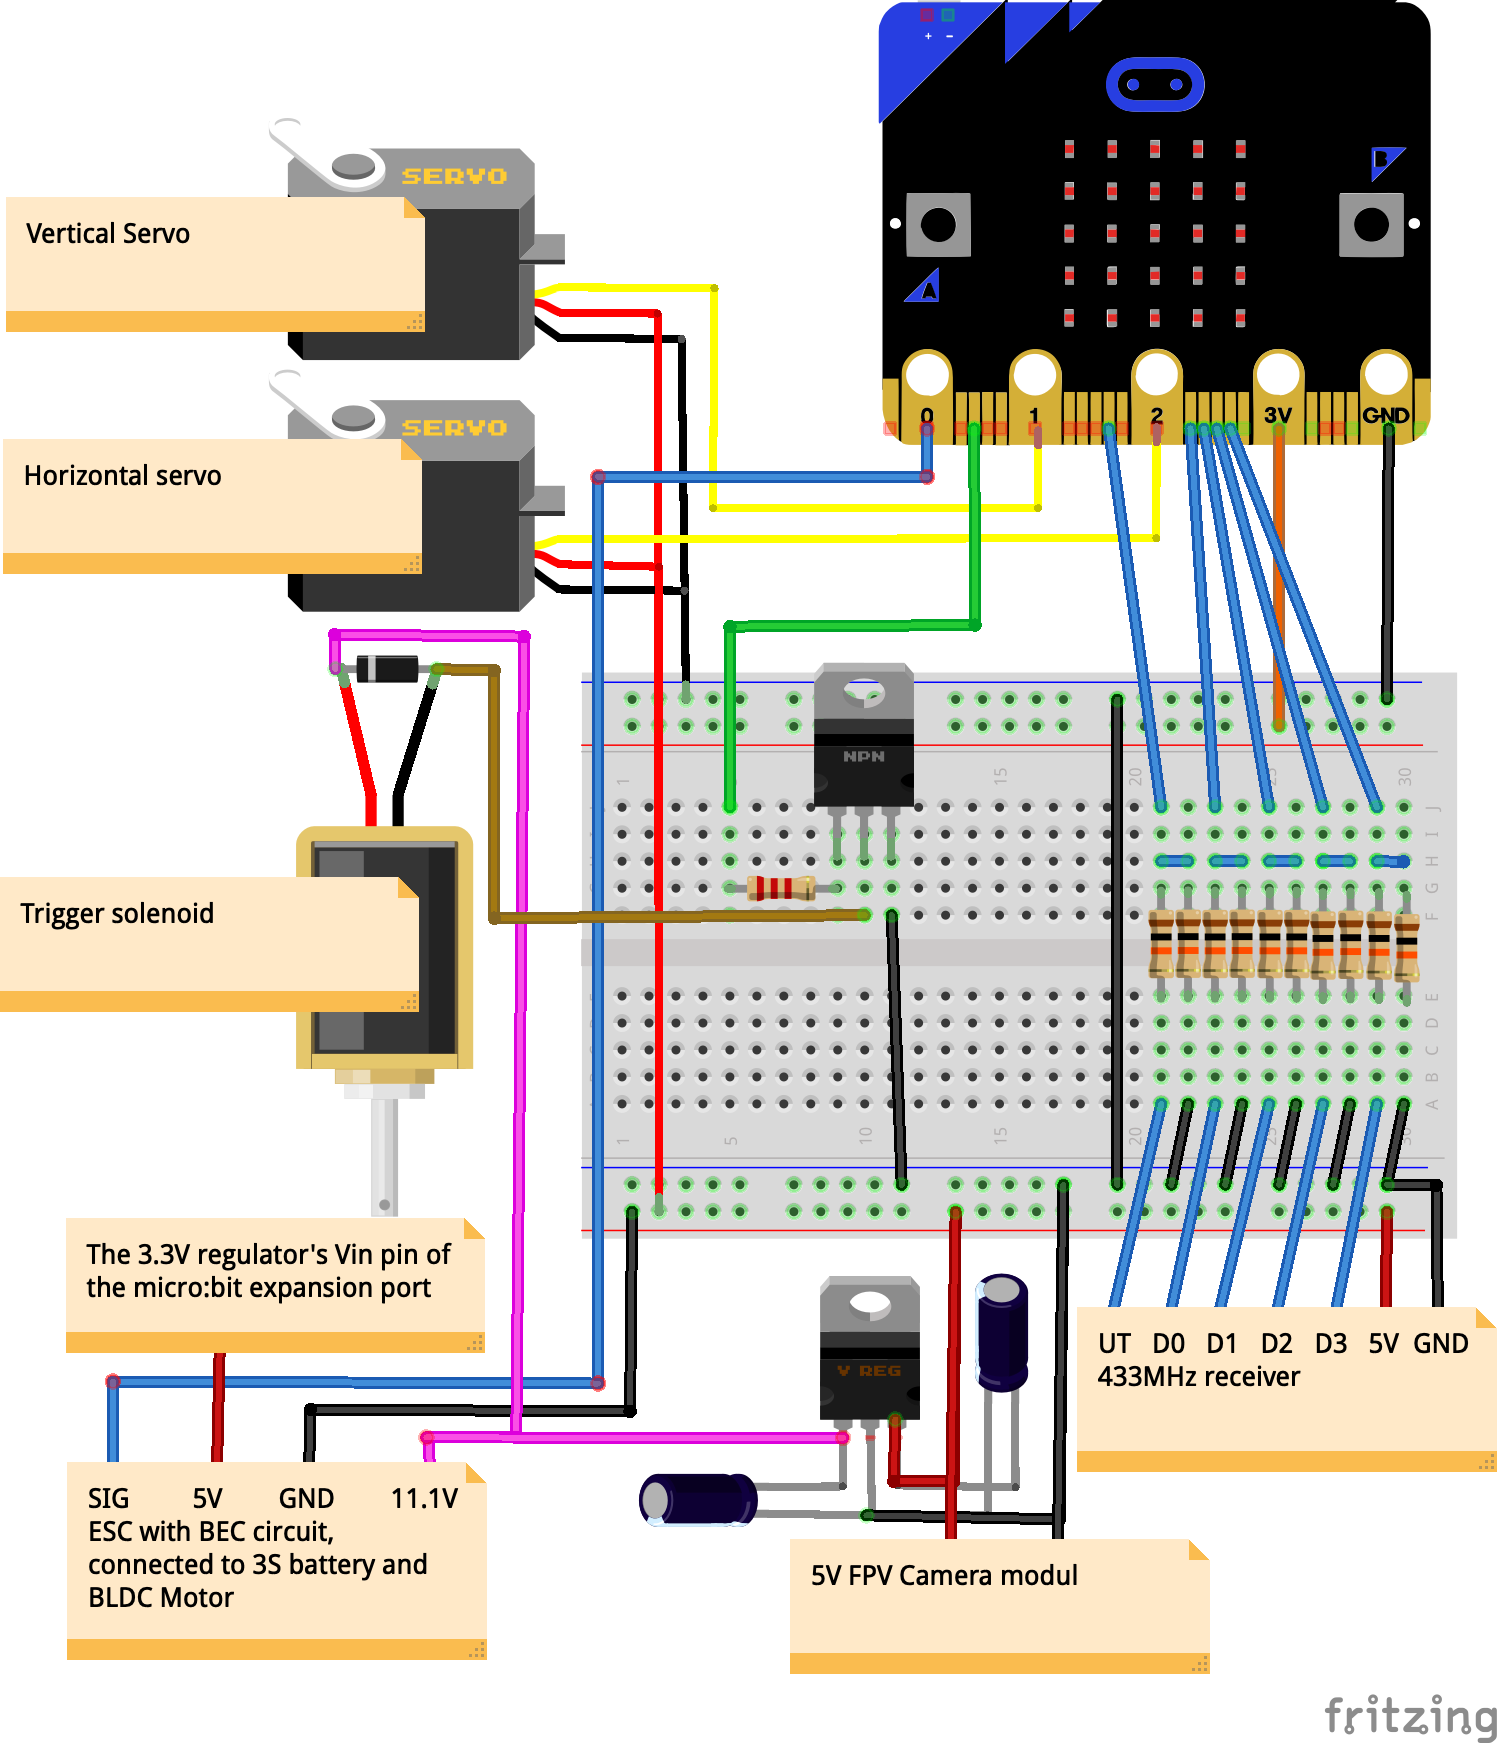
The battery eliminator circuit (BEC) of the electronic speed controller (ESC) can provide 5V for the circuits of the turret, but I was worried that powering the micro:bit, the receiver, the photographic camera and the servos might exist too much for it, so I only used that for the logic and I created a separate voltage regulator circuit to create a carve up 5V for the other things like servos, the solenoid or the camera.
1 / 2 • The voltage regulator and the transistor for the solenoid
The camera in the 200mW manner can draw a lot of power which ways that it can heat upwards a lot. Information technology also means that the 7805 IC volition oestrus up, so I added a pocket-sized estrus sink to the voltage regulator just to help some. I didn't experience any issues with information technology, just I'd still avoid running it too hot. On the right side of the image you can see the TIP120 transistor that is used to switch on the solenoid.
For detailed circuit diagram please bank check the schematics section part of this project.
The radio receiver circuit operates at 5V, while the micro:bit operates at 3.3V. As far as I know, the micro:scrap inputs are not 5V tolerant, so I had to do some logic level shifting. I used voltage dividers to exercise this. A agglomeration of 10k resistors did the chore. I could have gone closer to the 3.3V, only by using R1 = 10K and R2 = 10K resistors, I could lover the 5V to 2.5V which is still a logic high for the micro:bit, and then I went on with information technology.
1 / three • Level shifter circuit for the radio receiver
The voltage divider formula:
Vout = Vin * R2 / (R1 + R2) Using some insulating tape on these proto breadboards is a proficient idea to avert possible harm and short circuits.
The ESC and the BLDC motor
Connect the ruby-red and black wires to the battery. The three wire cable between them is 5V, GND and Signal. Connect the signal to the P0 pin of the micro:scrap. Connecting the ESC to the BLDC motor is easy. Choose a random society to connect the wires together. When you become to the point with the projection where you spin them up, check if the direction is expert. If not, alter 2 random wires of the motor and the direction should be expert now.
Test the direction without BBs! If Bbs go into the firing aqueduct, they will stuck and melt in seconds. Information technology volition crusade damage like this if you can disable it fast or worse if you tin't:
Besides these, the circuit is uncomplicated. But follow the diagram at the schematics section. Here's an prototype nearly the micro:bit that can assistance you detect what pin is capable of what:
Ada Development Environment with Airsoft Turret
This was my offset time that I used Ada. Information technology approaches things quite differently from C-fashion languages, simply after y'all spend some time with it, probably you'll realize that it is a very powerful language.
1. you need to setup your Ada Development Environment. Follow these steps to install GNAT on your computer.
2. If GNAT doesn't recognize your micro:bit, endeavour these steps.
3. Clone my Airsoft Turret repo and open information technology in GNAT. The src/master.adb contains the main code
iv. Build and flash the code to your micro:bit:
5. If everything went co-ordinate to the plan, you should see this eye on the micro:flake's brandish. Information technology ways that it is gear up in disarmed state.
GNAT provides a whorl text demo code when you create a new project, targeting micro:bit. You can as well find some dandy examples for how to employ dissimilar parts of the micro:bit with Ada. I recommend you checking information technology. I learned a lot from them.
The software
The code runs in an infinite loop. I created this state machine on paper first, then I implemented it in Ada:
State machine on the airsoft turret
The update actuators part besides contains the brandish update. Permit's get over some cases in loftier level!
1. In the initial state everything is disabled, the turret is not armed, and then you lot see the prissy ruby-red heart on the display
2. If you button all iv buttons together then the turret artillery itself. If it was armed, information technology disarms itself. Firing and movement is non allowed in disarmed state. When it is armed, the BLDC motor spins upward.
iii. When you push Left (D) and Right (A) together in Armed state, the trigger volition fire the BBs chop-chop into the firing aqueduct with the solenoid. The spinning motor will accelerate and shoot out the BB from the firing channel. When you are firing, you'll see a + symbol on the screen, flashing.
4. You tin can motion horizontally and vertically at the same fourth dimension. If you button upwards-down or left-right at the same time, no movement will happen.
5. When moving, you'll see unproblematic arrows/lines on the display pointing to the proper direction on the vertical and horizontal axis.
Lets view how it moves! The firing part is disabled on this video, then you just encounter the + on the brandish indicating the firing.
Here you lot can hear the trigger firing:
Problems
You might have noticed that I don't take a video nigh it really firing BBs. Unfortunately I can't show you a video nigh how the BLDC motor is spinning and thus firing because it is very likely that somehow the ESC got damaged. Maybe wire damage (didn't find contact issues, simply nevertheless that's my all-time guess), maybe something else from past experiments (it is a five or half dozen years old cheap ESC that was my go to experimenting ESC for a couple of projects), merely at present its motor (or other motors) doesn't spin with it. I created a exam code with the Ada micro:chip servo library that worked nicely, but unfortunately now the same lawmaking just causes the BLDC motor to shake violently and later even the shaking generally stopped. On the Airsoft turret trigger solenoid firing video you tin can run into what the BLDC motor does now when it should exist spinning.
Earlier, while I was waiting for the micro:flake to arrive, I tested the turret with an Arduino and information technology worked perfectly. It resulted a couple of scared people and "WTF?" faces, and then huge success. The firing power is not too high and the range is limited so it wasn't hurting people at all, unlike proper airsoft guns. The accuracy wasn't the all-time, but the high firing rate meant that I could e'er deliver hits in the range. Unfortunately I didn't think it would be genuine on an Ada contest to record that with an Arduino, and so at present I don't have whatever recordings almost it properly firing. I commented out the ESC related code then I tin forestall farther damage of the ESC or any other components, but probably it would work. A like lawmaking worked previously in an experimenting exam projection where I tested ESC control from the micro:scrap. two new ESCs are on their way to me, but I didn't have a spare office or easy way to become one fast, so information technology'due south a bummer.
You might also noticed that the servos' motion is a footling bit chunky sometimes. At showtime I idea it might be a software issue, simply afterward doing some experiments, I realized that information technology is definitely acquired by the servos. I concluded that the servos interfere with the receiver and the not uncommon servo jittering is also present here. Some ferrit rings volition aid with the jittering, simply I have to get some showtime.
When the motion was chunky, I realized that the direction indicator leds on the display were besides flashing. When I cutting power from the servos, the aforementioned code worked fine, no flashing and the smoothness of the movement depended on the position of the turret. I believe dissonance generated from the servos interfere with the receiver module. Changing the bombardment in the transmitter helped somewhat, but moving the antenna higher and further from the servos is too on the todo list to improve the reliability.
Camera
I did not write most the camera for a simple reason: information technology just works easily. This is the camera epitome that it can produce:
This is more than suitable for indoor usage, however different and better cameras tin be used for different utilise cases. I made the turret head modular, so you lot tin can attach a different photographic camera, trigger and prune mounts to it. I used this receiver to view the camera's prototype on my PC or on my onetime telephone:
I'm thinking that with some car learning, the turret tin be automated to shoot unknown people. That would be a fun addition!
Conclusion
I really enjoyed the process and learned a lot. Both on software side with Ada and hardware side with improving my 3D object designing capabilities. Ada is definitely an interesting programming language and it was peachy to work with it and I'chiliad looking forwards to encounter what others come upward with it, so I can larn more than.
I remember the turret turned out to be a nice improver to my projects and while it needs some improvements (and repair at the moment), it is one of my most unique projects on hackster. It will reach its total potential, in one case I put information technology on an RC vehicle, only even in its current state, information technology is a very fun project that I tin can be proud of. The electronics are well protected, then it can survive some punishments and it is quite meaty. Maybe it can even be fabricated somewhat rainproof with some design improvements. Afterwards 1-2 revisions it can exist a nice addition to any airsoft fights. I encounter numerous paths how I tin iteratively move forward with this project.
Thank you for reading, have a nice twenty-four hour period and here's a pic to commemorate my quadcopter crashing into a agglomeration of pig shit:
Custom parts and enclosures
Schematics
Lawmaking
Credits
How to Make a Rc Airsoft Turret
Posted by: tuckerharsecy1980.blogspot.com
0 Response to "How to Make a Rc Airsoft Turret"
Post a Comment